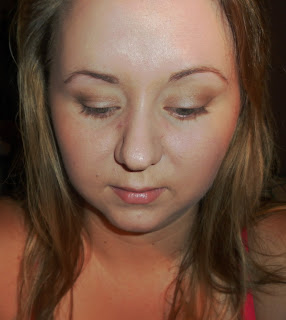
The weather here is super yucky, so today I decided to do a neutral, warm look to make me excited for some soon-to-be-warm weather.
I used 3 palettes today: QUO Back To Basics (which is a GREAT NAKED dupe), UD Naked Basics, and Too Faced Boudoir Eyes Palette.
 First, you want to start with foundation and concealer. Here I used a combination of Rimmel Wake Me Up Foundation and CoverGirl Aqua Smoothers foundation. I like to mix the two to get my perfect shade.
Next, you want to create a base for your eyeshadow using an eyeshadow primer. I used UDPP. Then you want to cover your lid in a nude shimmer. I used Birthday Suit from the Too Faced Boudoir Eyes palette. You want to bring the colour all the way up to your crease.
Next, I took the shade Naked from the UD NAKED palette and applied it to my crease and outer corner. This will add depth to your look.
Now, a trick I like to use when applying darker shadows to my outer corner: use scotch tape! Stick it to your arm first, so it doesn't hurt to peel off, and line it with your bottom lash line up to the end of your brow.
Next I applied a TINY bit of Faint from the UD NAKED Basics palette to my outer corner. This shade is VERY deceiving, as it shows up way darker than anticipated, so be careful! For this, I used a fluffy blending brush. Mine is QUO brand, but a MAC 217 would work as well. Now it's time to remove the tape from your eyes, and you should have a faint but solid line of where the eyeshadow ends.
Now it's time for eyeliner! I used Maybelline Master Precise liquid liner pen in black. I made a very thin line, and winged it out just a bit, following the line from my shadow (easy, right?!). At this time, I also filled in my brows, and added bronzer and highlighter to my cheeks. For this look, I like a sun-kissed glow, so I applied bronzer on my temples, my cheeks, and a bit on my nose and chin. I used Benefit's Watts Up highlighter, and applied it to the tops of my cheekbones and under my brow.

Last, I curled my eyelashes using my Sephora brand eyelash curler. I heated it up with my blowdryer for a few seconds before using it on my lashes. If you're going to heat up your eyelash curler, be really careful! It's very easy to burn yourself, as your eye is SUCH a sensitive area. After curling my lashes, I used Covergirl Clump Crusher mascara on my top lashes, and Benefit They're Real! mascara on my bottom lashes. I like to use waterproof/water-resistant mascara on my bottom lashes because my eyes water a TON, especially when it's bitterly cold out (curse you, winter!). To finish the look, I applied MAC Creme Cup lipstick. If you don't have the money to shell out for a MAC lipstick, Maybelline ColorSensational in 015 Born With It is a great dupe.
This look takes about 20 minutes from start to finish, so it's very do-able! Since there's no crazy colours, it's a good look to practice your skills with. Happy Spring!


No comments:
Post a Comment